Cactus Quilted Wall Hanging Free Pattern

I love the succulent trend that is so popular right now, but unfortunately I can’t seem to keep the living variety alive. You don’t want to know how many cacti that have died under my care ;). Today’s Cactus Wall Hanging Tutorial and Free Pattern, sponsored by Jo-Ann Fabric and Craft Stores, is just what I needed, and you can read on to make your own!

This wall hanging would also be great as a gender neutral baby quilt, which can be made by simply leaving off the hanging loops!

Whether it’s in your living room or your baby’s nursery, your cactus wall hanging will add the perfect southwestern touch to any room!

We’ll be using two different easy quilting techniques, including raw edge appliqué and tying. Let’s get to work!

Supplies:
solid white quilting cotton – 2yd (cut 1: 24×30”, cut 1: 26×32”)
solid green quilting cotton – 1/2yd
solid brown quilting cotton – 3/4yd (for cactus pot and binding/hanging loops)
cotton batting – 26×32”
black embroidery floss
basic sewing supplies – thread, pins, scissors, hand sewing needle, etc
Access Cactus Wall Hanging Free Pattern Template HERE. Download file and print at 100%, taping pages together along borders and diamonds.

Print templates (ensure there is no scaling), tape pieces together at triangles, and cut cactus and pot.
Cut cactus fabric and Heat n Bond piece10x19”. Cut pot fabric and Heat n Bond piece 7×8”. Follow manufacturer’s instructions to fuse Heat n Bond to wrong side of cactus and pot pieces.

Trace cactus and pot templates onto paper side of Heat n Bond. Cut pieces out.


Remove paper from Heat n Bond on each piece and place on wall hanging front (white fabric cut to 24×30”), centering. Pot should slightly overlap bottom of cactus.

Remove pot and follow manufacturer’s instructions to fuse cactus to white fabric with iron. Stitch around cactus, close to edge (can use straight or zig zag stitch if desired).

Follow manufacturer’s instructions to fuse pot at base of cactus as originally placed. Stitch around pot, close to edge.

Next, make a quilt sandwich, with wall hanging back on bottom (cut to 26×32” with wrong side facing up), cotton batting in middle (cut to 26×32”), and wall hanging top on top (wrong side facing down).

Secure pieces together with pins, safety pins, or basting spray, concentrating on outer edges and around cactus. I prefer to use pins on a project as small as this, and find they work well as they are quick to remove when needed.

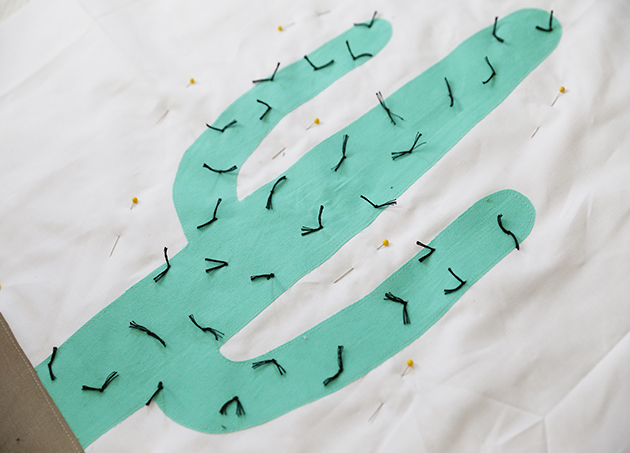
Use chalk or disappearing ink pen to mark placement of thorns on cactus as desired.

To make “thorns,” thread a long piece of embroidery floss on a needle and make a small stitch at each mark. It is easiest to make a row of stitches first. Next, cut between stitches, tie each thorn with a square knot, and trim thread ends to ½”. Be sure that consecutive stitches are spaced far enough apart that the floss ends will be long enough to tie when cut. Repeat until all thorns have been stitched and tied.


Stitch wall hanging edges together 1/8-1/4” from edges of wall hanging top. Trim batting and back to match top, ensuring wall hanging it squared.

To make hanging loops, cut three pieces of solid fabric 6×8”. Fold each loop piece in half lengthwise (wrong sides together) and stitch ½” from long edges. Press seam allowances open, turn right sides out and press flat, with seams down center of loops.


Fold loops in half (seams toward inside), matching raw edges, and stitch to back of wall hanging at top. Outer loops should be placed 1 ½” from outer edges, and third loop should be centered at top.

To make binding, cut 2 ½” wide strips, totaling 130” in length. To achieve continuous length, piece strips right sides together at right angles, stitching from corner to corner as pictured. Trim seam allowances to ¼” and press open.


Wrong sides together, press binding in half lengthwise.

Starting approximately 8” from corner on one side of wall hanging, stitch binding to top with ¼” seam allowance, matching raw edges and leaving a “tail” (10”) before stitches begin. Stop ¼” before reaching first corner.

To create mitered corner, remove needle and lift presser foot from fabric. Trim threads. Fold binding away from top, forming 90 degree angle with binding already stitched. Keeping diagonal fold in place, fold binding back down, forming another fold along edge where binding was stitched. Binding raw edges should now match raw edges of next side of quilt top.


Stitch binding to next side of wall hanging top, beginning ¼” from mitered corner. Repeat on remaining sides, stopping approximately 10” from where first stitches began.


Lay beginning tail along wall hanging top edge, overlapping end tail. Mark and cut end tail of binding 2 ½” past point where it meets beginning tail.

Open beginning and end tails of binding, wrong sides up. Flip end tail of binding over, being perpendicular to and matching right sides with beginning tail of binding as pictured. Pin in place, matching raw edges. Stitch two ends together diagonally, corner to corner.


Trim seam allowance and press seam open. Fold binding back in half, press along original fold, and stitch to wall hanging edge.


Turn folded edge of binding to wall hanging back and pin, with binding just barely covering stitches on back. Neatly fold mitered corners on front and back.


From front of wall hanging, stitch close to inner edge of binding around all four edges, being sure to catch binding on back with stitches.

Press hanging loops upward and stitch each to wall hanging, near top of binding.


Thread wooden dowel or branch (1” diameter) through hanging loops. Cut leather lace long enough to hang wall hanging as desired, and tie near each end of dowel with a square knot.

Hang your new cactus wall hanging and enjoy!


Great looking.