Free Women’s Cowl Neck Hoodie Pattern

If I had to choose one clothing item to wear daily (other than the, ahem, essentials), it would definitely be a hoodie. One of my favorite things about the weather starting to get chilly in the Fall is pulling out my favorites to add back into my wardrobe rotation! I had one RTW hoodie (two actually – in different colors because I loved them so much) that I wore non-stop last year, until they pilled passed the level of public acceptance. Times like this remind how awesome it is to know how to sew and draft patterns – I used the old hoodie as a base and tweaked it from there to get my new favorite cowl neck hoodie. And since I’m guessing some of you love hoodies as much as I do, I’m sharing this Free Women’s Cowl Neck Hoodie Pattern with you all today so you can fill your closet with them too!

I normally wear a size M, and like a roomy but not baggy fit for my hoodies. This pattern is sized accordingly, with a finished chest measurement of 38.5″ and finished hip measurement of 44″.
If you’re looking for a different size sweater pattern, check out our Casey Crop Sweater Free Pattern! It includes sizes XS-XXL and is my other go-to sweater when I want to be both comfy and cute! I also made a non-cropped version of the Casey Crop that I equally love.


One thing I really wanted to carry over from my old hoodie to this new pattern was the hemline. I hate having a tight or even snug hoodie band around my hips (that style also doesn’t work well with my body type), and the shape and fit of this curved hem is perfect if you feel the same way. I love that I never had to tug it down into place.

Oh, and the fabric! I’ve been hoarding these Raspberry Creek french terry prints for too long with the plans to make a hoodie for myself. Their CLUB fabrics are dreamy, and the french terry is my very favorite (okay, maybe tied with their swim fabrics…) – it’s amazing to sew with and so comfortable to wear. I also have to add that their customer service is the best you’ll find (this isn’t sponsored, btw) – Diana is an online friend of mine and the way she runs her shop and takes care of her customers makes me want to throw my money her way.

Now, if you want the ultimate hoodie that is ALSO A BLANKET (yep, I said it!), our Blanket Hoodie Free Pattern is a must-sew! They’re fun for the whole family!
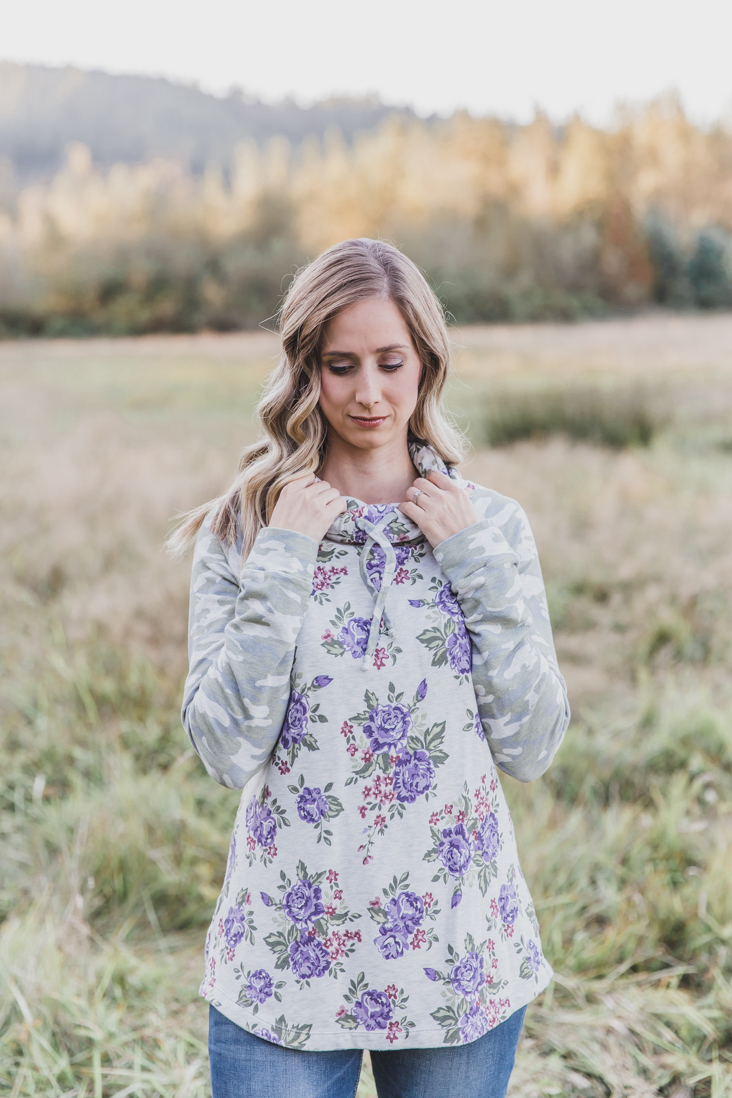
Thanks to the raglan sleeves on this free women’s hoodie pattern, it’s super fast to sew up! I’ve made two now and the second one definitely surprised me. You can make it with either a serger or regular machine, but using a serger will make it lightning fast and gives such a nice end result.
I love that a cowl neck keeps you warm without being too bulky like a full hood.


Free Women’s Cowl Neck Hoodie Pattern
Supplies:
– medium weight knit apparel fabric such as french terry with 40% stretch recommended – using a fabric with less stretch will result in a more snug fit – make sure to consider that as you choose your fabrics! I’ll be soon sharing one I made using ponte knit to show how it changed the fit
– from 54+” wide fabric (amounts allow for average shrinkage, if your fabric is wider than 54″ you may be able to use less fabric):
– for body and cowl: 1 5/8yd
– for sleeves, cuffs and tie: 1yd
– scrap of lightweight fusible interfacing
– basic sewing supplies – thread, ball point needle, pins, etc
– optional: 1/4″ wide clear elastic to help stabilize neckline (<–affiliate link to Etsy where I always purchase mine)
– Free Women’s Cowl Neck Hoodie Pattern – click here to be taken to download page. Follow the checkout process (no payment info will be asked for) and be sure to check your junk mail if the link doesn’t make it to your inbox (signing up for our newsletter on the right sidebar is great and we’d love to have you join, but is not how you access the pattern, you must follow the checkout page linked above).
*All seam allowances are 1/2″ unless otherwise noted.*
Notes on sewing with knits: Knit garments require the stitch to have the ability to stretch, which means you will need to use a serger OR a long and narrow zig zag stitch on a regular sewing machine. Also, knits tend to shrink a fair amount when washed, so be sure to prewash and dry your fabric before sewing (not optional, trust me!). Lastly, knits sometimes get wavy when stitched – be sure to use a lot of steam when pressing and this will help spring them back into their original shape!
Cut out fabrics and interfacing as directed on pattern pieces, following the layout below layout allows for body and cowl from one fabric and sleeves, cuffs, and tie from a coordinating fabric). Don’t forget to also cut the interfacing piece (not pictured on layout).

Right sides together (RST), stitch sleeves to back, matching notches. Press seam allowances toward back (press open if not using serger).


RST, stitch sleeves to front, matching notches. Press seam allowances toward front (press open if not using serger).

With front and back RST and each sleeve folded in half lengthwise, stitch continuously from bottom of sleeve to hoodie hem on each side. Press seam allowances toward back (press open if not using serger).

Fold tie in half lengthwise RST matching raw edges and stitch along raw edges. If not using serger, trim seam allowance to 1/4″. Use safety pin to turn tie right side out and press flat along seam.
Fuse interfacing to wrong side of cowl piece as marked on pattern piece.

On right side of cowl piece, stitch two buttonholes as marked on pattern piece. Use seam ripper to open each buttonhole center.

RST, fold cowl in half, matching straight edges. Stitch along edge. Press seam allowance to one side (or open if not using serger).

Wrong sides together, fold cowl in half, matching curved edges and notches. Pin edges together. Topstitch approximately 1 3/8″ from top fold of cowl (adjust this depending on the size of your buttonholes – stitches should be equal distance to buttonholes as buttonholes are to top fold of cowl) to form tie casing.

Use safety pin to thread tie through one buttonhole and out the other. Tie each end in a single or double knot and trim tie end 1/2″ from knot.

RST (right side of cowl has buttonholes), pin cowl to neck opening, matching front notches together and cowl seam with center back notch. Stitch along pinned edge, gently stretching cowl to fit neck opening. Press seam allowance toward cowl. TIP: For extra neckline stability, place clear elastic along seamline, allowing it to be stitched in place with cowl/neckline seam.

RST, fold each wrist cuff in half, matching short edges. Stitch along short edges. Press seam allowance to one side (or open if not using serger).

Wrong sides together, fold each wrist cuff in half in opposite direction, matching raw edges.

RST, place end of each sleeve into each cuff, pinning and matching raw edges and seams. Stitch around pinned edge on each side. Press seam allowance toward sleeve.

To hem hoodie, press front and back bottom 1″ toward wrong side. Topstitch close to raw edge using zig zag stitch, twin needle, or coverstitch machine (my very favorite way to hem knits!).

Great job! Be sure to share your hoodie, we’d love to see it! Tag @sewmuchado on Instagram and share your finished hoodie in our Facebook Group! Now that you’ve mastered sewing your own hoodie with our free women’s cowl neck hoodie pattern, be sure to check out our tutorials gallery and pattern shop for more fun sewing projects!


Thank you for offering this free pattern! How do I download it?
You are welcome! To download it, just follow the instructions under the “supplies” section of this post.
Thank you for your free sharing! How do I can print the instructions? When I make the selection to print doesn’t appear all the photos and text
Hi! Every browser will act differently, but the instructions are designed to be read on a computer, tablet, etc only rather than printed, so I haven’t experimented with any printed options.
Has anyone tried this with fleece for the body and a knit for the sleeves and cowl?
I have made other garments like this and refashioning garments, as well, by doing a similar thing. You just want to try and get your knit to be close to the same thickness or something like a thermal knit, as a possibility.
This is so cute! I love how you did a contrasting sleeve. It looks great and I can’t wait to make it!
Aw thanks Lisa!!
Is there a hood option for this?
Hi Connie! I haven’t drafted a hood option, just the cowl neck :).
I made this hoodie the other day and it is honestly the hoodie I never knew I needed! I am starting up a blog and am drafting up a post about this hoodie!
Thank you so much! I cannot wait to make more!
Oh that is so great to hear! I’d love to see your blog post once it’s up!
This is a perfect pattern! I made 2 in a weekend….and I am not an expert at sewing. The directions where so clear and plenty of pictures! Yay! I made one from low loft antipill fleece and it is adorable. Looked on site for more womens patterns…none :( Sure hope you can find some time between raising those adorable kids to add some! Thanks so much!
Aw thanks so much! And fingers crossed we’ll get some more womens patterns in the shop soon! We do have one at the moment, the Seafarer Top, which is my go-to dolman top pattern: https://www.sewmuchado.com/shop/pdf-patterns/seafarer-top-pdf-pattern
Does the pattern come is size medium only? It is a lovely pattern.
Thank you! And yes, for now it’s only size M :).
Love this! I want to try and make one, but I’m not a size medium, and not really a sewist…. I’m a quilter. How would I adjust this to be large enough for an XL?
Hi! To adjust it to an XL, you’d need some pattern grading experience – you could try your local library for some books to get you started if you’re interested!
I have printed out the pattern, but am having a really hard time putting the pieces together. I have never downloaded a pattern to put together and this has really got me. Can you please help :-)
Hi Shirley! To put the pages together (do this before cutting anything out), you’ll need to match up the borders and diamonds on each page, putting them in numerical order. You can cut around each page border to make it easy or if your paper is see-through enough, just match them up as is, which is what I usually like to do. Does that help?
Hi, I’m having a really hard time matching the pieces even though I’m lining up the diamonds and working numerically. There are so many small sections that need to be taped on as well. Any other suggestions?
Hi Karoline, the first thing I would do is check that the pattern printed correctly at 100% and didn’t scale smaller or larger. Also, it sounds like you perhaps cut the pieces out before taping the pages together? Taping the pages together first before cutting will make it much easier to line everything up correctly. Does that help?
Gracias por el patron y las instrucciones, excelente aporte.
Can you please tell me where I find the instructions for sewing the hoodie. I thought I saw 2 different web addresses one for the pattern and one for the instructions.
Thank you for this pattern looks like fun.
Hi Rita! The instructions are right in this blog post that you commented on. The pattern download can be found through the link under the “supplies” section. Hope that helps!
Thanks
What is the length of the finished sweatshirt? I am 5’8 and wondering if this will cover my long torso. I’m also 25 weeks pregnant but I don’t expect it to fit for much longer. I just want to make sure it will fit when I am “regular” size again. Thanks!
Hi! The back length (excluding the cowl) is about 26.25″ finished, hope that helps (and congrats!)!
I just finished this pattern in a french terry, and I love it, it’s such a great look. It went together beautifully using both a sewing machine and a serger. I made the ties narrower (personal preference) and I will probably shorten the sleeves a little bit, but look forward to wearing it all the time. Thanks!
Awesome, so glad to hear it!
I used to be a 34 bust, but that was way back in the day, and the years have not been kind. Currently I am a 40, so I altered the pattern by adding 3/4 inch at the sides of the back and front. Then I extended the sleeves at the underarm by the same amount at each side, and graded it down to a bit above the elbow. I put the cowl on as soon as I had the sleeves on, because I was afraid I would inadvertently stretch out the neckline. It went together beautifully! From start to finish, this hoodie came together in 1 hour. Great job drafting this pattern, the PDF went together easily. I plan on making one for each of my granddaughters, I know they will love hem.
Thank you so much for such a nice pattern!
That makes my day to hear, Carol! So glad it worked well for you with the adjustments too!
Hi,
Would this be ok to make in a polar fleece material?
Thank you.
Hi Vivienne, it might work if the polar fleece has some stretch, but it will likely fit smaller than if it were sewn using a different knit with more stretch.
I would have loved to know if there was a grading… So sad to download the pattern and find out it is only one size.. Medium… I’m larger than that! Beautiful pattern!! I’ll maybe attempt at grading it myself!
Hi, When you say seam allowance is 1/2 is this included in the pattern or do I have to cut 1/2 out from the edge of the pattern piece. I have made one and love it although it seems to have come up a bit small.
You don’t need to add any seam allowance to the pattern, it’s included in the pieces. I’d double check that your pattern printed at 100%, and also the type of knit you use will make a difference in the fit (for example, less stretch will make it fit smaller). Hope that helps!
Absolutely love this thank you! Looking forward to checking out your other patterns :)
Thank you for sharing this great pattern. I made my first over the weekend and plan to make many more!
Thank you for the great pattern. I just finished mine in fleece, it is very cozy and warm. I added a kangaroo pocket to the front, a small pocket to the sleeve, also increased body to 40” in chest area, as well as 2” length. Fits perfectly!
Hi
I love the pattern but i can’t undestant where to put the tie. Can you explainme please??
The tie will be close to the top fold of the cowl once it’s folded in half and sewn together. The buttonholes will be just below the fold (through front layer of fabric only) on the center front. Does that help?
Hi, I think I have finally figured out how to assemble and cut out the pattern pages, but I have a suggestion to help people understand it more easily. You do say to match up the diamonds, but if you also explain that you lay the pages out across and down, I think that will help. The top row is pages 1-6 across, second row is pages 7-12, each “attached” to the one above, third is pages 13-18 and fourth is 19-22. I also think if you provide a photo and/or video of this, it would be a huge help to people who are new to this.
Thanks very much – I’m excited to make this! Oh, do you think I could just skip the tie all together and leave it as cowl? I’m hoping that polar fleece will work well for this – hopefully I can find some stretchy stuff. Thanks again!
Yes you can definitely skip the tie, I do it all the time! If you’re using polar fleece, just be aware that it will likely fit smaller than intended unless like you mentioned, you can find a stretchy version.
I have followed instructions and still no pattern has come through, tried a few times.
Hi Sue, if your email provider is somehow blocking our emails, you can login to your account under the “shop” tab of our site and download the pattern from there!
Thank you. Love this. Easy pattern to follow and took hardly any time to sew up. Going to make a dress for winter with same top.
Hi I’m not very good at sewing or following patterns, this was a very easy pattern to work out and follow . I didn’t string the hood as left just as cowl neck. I used sewing machine with zig zag and I stay stitched the neckline , I also tightened the cuffs. I’m pleased with my first attempt. THANK YOU for the free pattern
I don’t quite understand how you can put both the front and back pattern pieces on a fold without cutting one on the wrong side, or changing the orientation of the piece so it can lie face up on the fold. Can you explain this? I’m assuming your layouts all are pictured with RS of the pattern piece up.
Hi Irene! You’re correct, you would need to flip one pattern piece over to cut as illustrated. Thanks for the heads up as I should have mentioned that in the instructions and will add it in!
Thank you <3
I am so thrilled to find this…I have an old tunic length hoodie that is similar and I love it but the fabric is so worn out. It is my favorite, and so bummed I can’t get another. I’m going to try your version because it’s perfect for me, just have to enlarge the pattern a bit lol. thank you so much for sharing the pattern and idea !