DIY Scalloped Zipper Pouch Tutorial (with the Cricut Rotary Blade!)

Can a girl ever have too many zipper pouches? I think we would all agree that the answer is a big no. Last week we delved into the very basics of the Cricut rotary blade, and as promised, today I’m back with a fun and easy project that will teach you how to cut fabric with your Cricut Maker (and perhaps falling in love with the process). I’m sharing this DIY Scalloped Zipper Pouch Tutorial with you and I can’t wait for you to start whipping them up for yourselves!

These pouches are perfect for makeup… gifts… you name it! The boxed corners allow them to be roomy while standing up on their own.

I love that you can shop for not only your machine supplies on Cricut’s site, but also fabrics! I shared a peek of this fabric in last week’s post, and was so excited to finally get to cut into it (er, let my Maker cut into it). The line is Let Them Be Little from my friends Liz and liZ at Simple Simon for Riley Blake, and is just too darling! I couldn’t resist the ginghams – there’s even a gold, but as hard as I tried, I couldn’t figure out how to work it into either of these pouches, lol. I guess even gingham has a limit… The fat quarter stack was perfect for this project, and I have plenty left over to make more pouches!

I shared earlier that the rotary blade can cut many different types of fabrics, and today’s project is putting it to the test! We’ll cut not only our cotton fabric with the Maker, but also the fusible interfacing and fusible fleece. And when you’re done with today’s project, you can find plenty more project ideas over on Design Space!

The rotary blade is really one of the things that sets the Maker apart from other machines – while I love the Explore Air 2, the rotary blade only works with the Maker, and because of that, the Maker is my very most used machine.

When it comes to scallops, precision is key – a wonky cut or sewn scallop takes a project from looking handmade to homemade, and it was awesome to rely on my Maker to cut them for me! Because they were so perfectly cut, the pieces went together perfectly, and sewing them was a dream.

Let’s get started!

DIY Zipper Pouch Tutorial with the Cricut Maker Rotary Blade
Supplies: (affiliate links below)
Cricut Maker and rotary blade (you can find replacement blades here)
Cricut fine-point blade
fabric (main, lining and scallops) – I used a fat quarter stack but you can see the dimensions needed for each material below
fusible lightweight interfacing – 11×22″
fusible fleece: 10×17″
Cricut iron-on: 6×2″
Cricut fabric mat (12×24″): (if you have multiple fabric mats they’ll come in handy!)
Cricut light grip mat
Rotary cutter and mat
zipper: 10″ or longer non-separating
FIND THE PROJECT IN DESIGN SPACE HERE
Open the project in Design Space and click “Make It” in the top right corner after clicking through from the first screen. Change each material size (excluding the iron-on mat and scallops, although in the screenshot you can see that I changed the scallop mat as well – it’s fine either way) to 12×24″ to reduce the number of mat changes needed. Once that’s changed, there will be 6 total mats to be cut. Also, be sure to click “mirror” on the iron-on mat.


Use a rotary cutter and mat to cut each fabric to the dimensions below (the fabric mat can hold fabric up to 12″ wide, and I usually like to leave the fabric long and cut off the excess afterward to keep in my scrap pile, so the dimensions listed below are the minimums). Since I was using fat quarters that are 18×22″, all I needed to do with my fabrics was trim the 18″ side down to 12″ which made it super quick! Be sure to watch for directional prints as you’re cutting – the 12″ side should always be going across the print for this project.


(dimensions are width x length, colors refer to mat colors in Design Space, NOT to fabric colors)
Mat 1 (grey): fusible fleece – 10x 17″
Mat 2 (white): fusible lightweight interfacing – 11×22″
Mat 3 (black): main fabric – 11×20″
Mat 4 (pink): scallops – 11×12″
Mat 5 (orange): iron-on – 6×2″
Mat 6 (gold): lining fabric – 11×20″
Once you have your materials ready, it’s time to get cutting! Ensure you have the Cricut rotary blade installed in your Maker and grab your fabric mat(s) – they’re pink which makes it easy to find the right one! If you have multiple mats like I do, definitely use them as you can prepare the next material while one is cutting, and swap them out as each one is finished cutting. I like to have an assembly line ready with my 3 mats and it makes everything go so quickly!

Mat 1: Load the first material, fusible fleece onto a mat. A great tip for getting the material smoothly on the mat is to roll it up, place the top edge on the mat, and then slowly roll it out while smoothing as you go. Make sure the fusible fleece is firmly on the mat and adjust the material setting to “fusible fleece”. Follow the on-screen prompts to load your mat and let the Maker start cutting! Once it’s done, unload the mat and remove the excess fusible fleece, revealing the precisely cut pieces.


Repeat the steps for mats 2-4, paying attention to the material setting changes as noted in each screenshot.
Mat 2:


Mat 3: 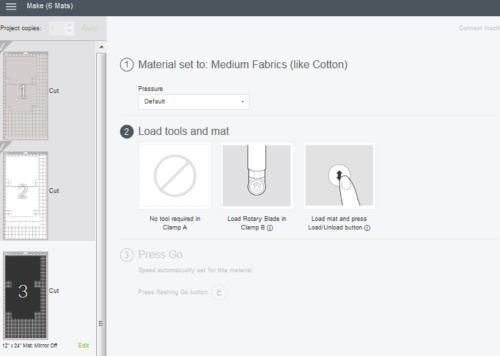

Mat 4:


Mat 5:
For Mat 5 you’ll need to swap out the rotary blade for the fine-point blade. If you’d like, you can skip ahead and cut Mat 6 first like I did (just click on the Mat 6 image in Design Space) so you won’t have to swap out your blade twice, but otherwise remove the rotary blade and install the fine-point blade to cut the iron-on. Make sure you’ve selected “mirror.” Once it’s cut and the mat is unloaded, use a weeder or tweezers to remove the negative vinyl and set the lettering aside for now.


Mat 6: (don’t forget to put your rotary blade back in if you just cut the iron-on!)


Great job! Now that the Maker has done all of the cutting work, it’s time to fuse the interfacing to each corresponding main fabric and scallop piece. I like to use my EasyPress 2 because it fuses the interfacing so quickly and evenly – it’s a serious interfacing game changer and takes all of the annoyance out of getting each area of the interfacing fused to the fabric (you know what I’m talking about, right?). You can move the interfacing about 1/16″ away from the edge of the scallops to keep it away from your EasyPress 2 mat or ironing board.


Next, fuse the fusible fleece to the interfacing on the main fabric pieces, centering on all edges (to keep the fleece out of the seam allowances, the pieces are 1/2″ smaller on all sides except bottom inner corners, where they are 1/4″ smaller than main fabric edges). I use my EasyPress 2 for this step as well, but after placing the fleece, I flip the fabric and fleece over and press from the fabric right side to avoid melting the fleece.

While your EasyPress 2 is handy and the fabric is warm, fuse the iron-on onto one of the main fabric pieces, centering between sides, top, and upper edges of bottom cutouts. I used a setting of 315 degrees for 30sec and it was perfect. Remove the plastic covering while it’s still warm and voila!
Important Note: Once your iron-on is fused, you’ll need to be cautious that you don’t ruin it with your iron while making the pouch. If you’re worried about it, you can leave this step until the very end – it’s a little trickier to fuse it on the completed bag, but eliminates the worry of wrecking your beautiful iron-on. Either way you prefer is fine!


It’s time to start sewing!
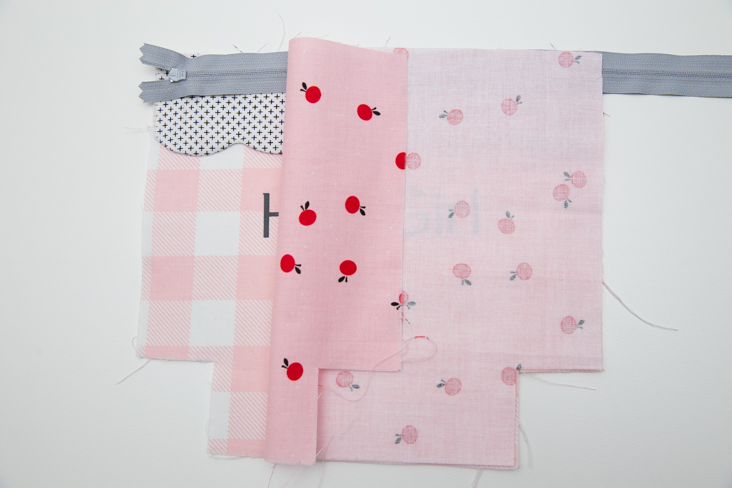
Right sides together (RST), pin and stitch two scallop pieces together along scalloped edge with 1/4″ seam allowance. It’s helpful to stitch slowly and shorten your stitch length to form smooth curves. As each corner, lift the presser foot with the needle down, pivot the fabric, and continue sewing. Repeat with remaining two scallop pieces. See how perfectly the Cricut rotary blade cut each piece? Dreamy :).

Trim seam allowances, snipping closely at inner corners without cutting through stitches. Turn each piece right side out and press flat along scallops. It helps to roll the seams with damp fingers before pressing.


Baste one scallop piece to the top of each main fabric piece using 1/4″ seam allowance.

Place zipper face down at top of one main fabric piece with zipper top stop 1/2″ from edge of main piece. Sandwich zipper between main fabric and lining by placing lining right side down on top of zipper and main fabric. Stitch along top edge with 1/4″ seam allowance, securing zipper between main fabric and lining.


Flip main fabric and lining wrong sides together and press flat along stitched edge (watch out for the iron-on!). Topstitch 1/8″ from top of scallop.


Repeat steps above with remaining main fabric and lining pieces and opposite side of zipper.


With zipper partially open, place main fabric pieces RST and lining pieces RST, pinning or clipping along edges.

Stitch along four outer edges (leave cut out corners unstitched) using 1/2″ seam allowance, and leave 4″ opening on bottom of lining (to turn pouch right side out through later). Trim seam allowances excluding bottom edge of lining and trim excess zipper.


Open up raw edges of one corner cut out and pinch together, matching bottom and side seam allowances (seam allowances should lay in opposite directions to reduce bulk). Stitch along raw edges using 1/4″ seam allowance, forming boxed corner.


Repeat with remaining corners.

Turn pouch right side out through opening in lining. Pull lining out of from bag, fold raw edges in 1/2″ at opening, and stitch close to folded edge to close opening.


To help pouch stand up on it’s own, fold from bottom corner to corner, allowing center of bottom edge to make a crease upward. Press in place.

Great work! Now that you’ve mastered how to cut fabric with the Cricut Maker, you can make three more for friends!

Have fun filling it up with your favorite makeup, goodies, or small gifts! And for another fun Cricut rotary blade project, don’t miss our Girl’s Heart Purse Tutorial – perfect for Valentine’s Day or any day of the year!
This is a sponsored conversation written by me on behalf of Cricut. The opinions and text are all mine.


I don’t have a Crichton’s but would love to make one. Do u have instructions for the old fashion way?
Hi Laura! The project is only available on Design Space for now!
Is the pattern still available on design space??
Yes, the link is under the supplies section above!
I have been trying the link but. thing opens in design space. Is it still available?
Hi Lee, yes it’s still available but seems to be a little more finicky now that Design Space is a desktop only program. What usually works is to first open and login to DS on your computer, and THEN click the link to open the project. I hope that helps!