DIY String Art Tutorial
Do you love string art as much as I do? It’s one of my favorite recent trends, and I love how easy it is to create your own one of a kind design! Today I’m sharing a DIY String Art Tutorial!

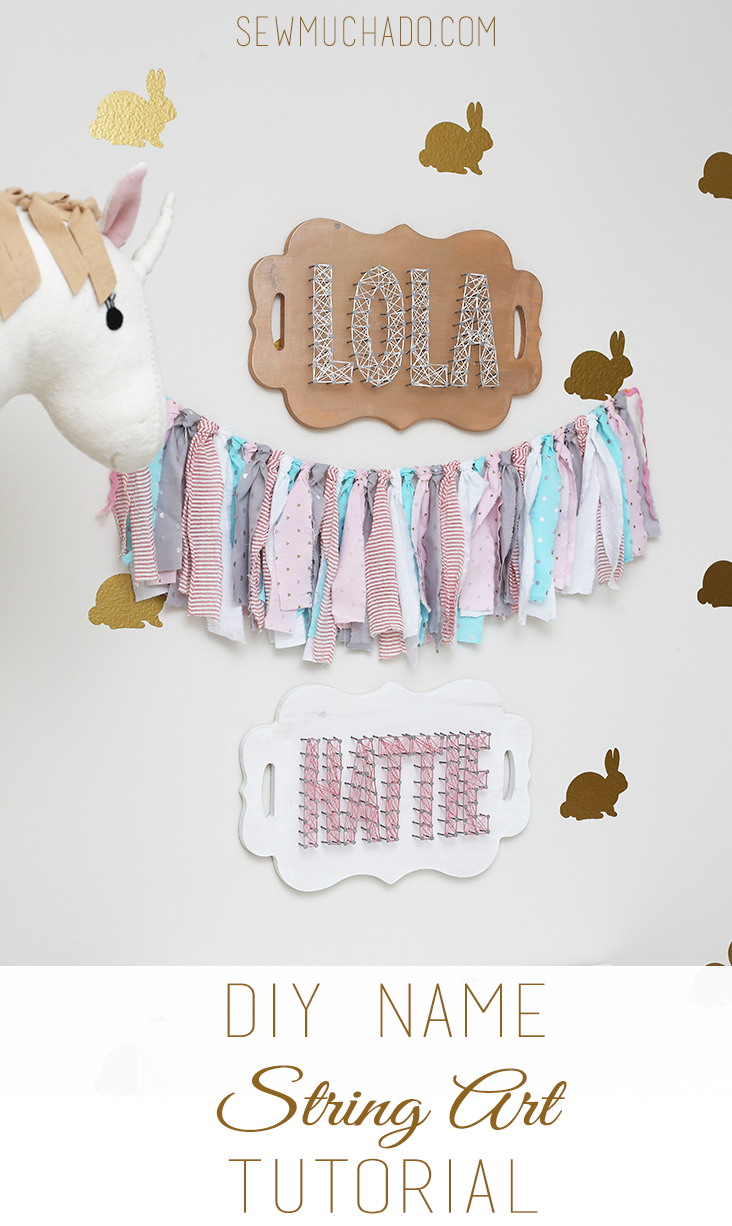
These DIY string art wall hangings were the perfect addition to my girls’ DIY Vinyl Bunny Wall.

I really enjoyed getting Lola and Hattie involved in this project. They came to my local Jo-Ann Craft and Fabric Store with me, and absolutely loved helping to pick out colors for their names and boards.

After much important deliberation (no one had any strong opinions ;)), we settled on two coordinating projects, and could not wait to get home and get to work!


Their finished DIY string art names were the perfect addition to their room!

Ready to create your own DIY String Art?
DIY String Art
Supplies from Jo-Ann Fabric and Craft Stores:
Pre-cut wooden board
Embroidery floss – each name I made is approximately 8.5×11”, and each letter used 1 skein of floss
Acrylic craft paint – I used Martha Stewart Metallic Rose Gold and Wedding Cake found at my local Jo-Ann
Sponge brush
Sandpaper (fine grit)
3M hanging strips
Other Supplies:
Paper and printer
Hammer
1 1/2” nails (I used galvanized steel nails)
Tweezers
*Supplies and compensation for this post provided by Jo-Ann Fabric and Craft Stores. All content, photography, and opinions are my own.*


To start our DIY string art project, sand any rough edges of the wooden board with fine grit sandpaper.

Measure board to determine desired name size. Print name onto paper in desired size.


Paint board using sponge brush and acrylic paint, repeating coats as desired. I did one coat to allow the wood grain to still be visible. Let paint dry completely.

Center name on board, and either tape in place, or you can place a couple nails in opposing corners (on outside corners of letters) to hold the paper in place.

Beginning on one side, hammer nails approximately 1/2” into wood along outside and inside of each letter, spacing 1/2-3/4” apart. Adjust nail spacing as needed to place them evenly on each row of nails, ensuring each corner has a nail. Be sure that nails do not come through on back of board.


Once nails are all in place outlining each letter, tear the paper away from the nails. Tweezers are helpful to remove any small pieces that are stuck at the nail hole.

Now the real fun begins! Starting on one corner of one letter, use one end of embroidery floss to tie a square knot around nail shaft. Trim loose end close to knot.

Begin wrapping the outside of that letter, looping the floss one time around each nail and making sure floss is pulled tight. Repeat around the outside one or two more times to help define each letter. Repeat with inner row of nails on that letter if applicable (no need to cut and re-tie floss, just string it across from the outside nails to the inside).


Once outside and inside borders have been outlined on that letter, begin to zigzag the string back and forth between the nails. There is no wrong way to do it! You can create a pattern, or make it completely random. The goal is to fill in as much space as possible to help each letter stand out. When letter is completed, tie off floss around a nail with another square knot and cut floss close to knot.


Repeat steps above for remaining letters. You can use all the same color of floss or mix it up with different colors!


Once all of the letters are wrapped with floss, use 3M hanging tabs to hang the string art in its new home.

Great job! Now that you’ve learned how to master a DIY string art project, use your imagination and make some more – the possibilities are endless!

My girls are so thrilled to each have their own name string art hanging in their room, and now my boys think it’s their turn! I think I may just put them to work to make their own! Hope you enjoyed this DIY String Art Tutorial, and thanks for reading!


This really is a brilliant idea!
Thanks Jenya! <3
LOVE this! Especially because one of my girls has a name we can never find on things that are personalized.
Plus it looks way cooler:)
I love this idea. Maybe if I start now I can have some done for presents by Christmas. Haha.